• Skip to navigation
  • Skip to main content
  • Skip to footer

Webhead

An independent web developer in Hawaii, developing WordPress websites, themes, and plugins

  • Plugins
  • Blog
  • About

webhead

Why use Refresh Tokens with JWT?

August 26, 2021 by webhead

There’s a ton of information on the web describing what a JSON Web Token (JWT) is and what it’s used for. JWT.io describes it as:

JSON Web Token (JWT) is an open standard (RFC 7519) that defines a compact and self-contained way for securely transmitting information between parties as a JSON object.

https://jwt.io/introduction

In this post JWT will be referred to as the “access token” because it’s used to gain access to resources. Once that access token expires, a refresh token is used to get a new access token. But if we already have a token that doesn’t expire, why do we need both? Can’t we just use the refresh token as our access token?

On a small system, yes, you probably can use one token to access your protected resources. If that token is stolen, remove the token from the website and that token would be useless. Then the user would just need to login again.

Two Tokens For Scalability

Refresh tokens are most useful when you need the ability to scale. For example if you have two separate servers: an authorization server and a resource server. The user would login to the authorization server (i.e. Google) and then access the resource server (i.e. YouTube). With just one token, both YouTube and Google would need a copy of your token in order for it to be able to revoke access. However, if you Google gives you a refresh token so that you can keep getting access tokens and YouTube only accepted access tokens, only Google would need to keep track of the refresh token.

Analogy

Think of this system like the box office and the theater. You go to the box office and give them your credit card (i.e. your login). The box office gives you a ticket (i.e. access token). The box office also tells you they have your card on file, so they give you a special code (i.e. refresh token) that you can use to get more tickets. Now you can use your ticket and see a movie at the theater.

If your ticket gets stolen, it’s only good for the one show. You can just get another ticket to see the next show.

If someone calls the box office with your code (i.e. your refresh token gets stolen) they unfortunately can get your ticket. But you realize or suspect it was stolen because you see some activity you don’t recognize. You can ask the box office to invalidate your code (delete the refresh token). You’ll need to restart the process, but it’s just you that needs to login again.

If the box office accepted tickets to give you new tickets, that would mean a stolen ticket could always get a new ticket. The box office would need to not accept all tickets for all their patrons and start over.

Conclusion

No system is perfect, tokens will be tokens and get stolen. When they do, refresh tokens eliminate the need to force their entire user base to login again. When things are not being stolen, refresh tokens allow users to login a lot less.
Getting Next-Gen Image format WebP on WPEngine and Cloudways

May 29, 2021 by webhead

Intro

Back in 2010, Google announced a new image format called WebP. Over the years Google has developed WebP into truly the next generation format for images on the web. The format is roughly 25% smaller in file size than their JPEG counterparts and about 3x smaller than PNGs. In 2020, browser compatibility started speeding up with Apple adding support to their Safari browser (version 14) in September 2020. As of May 2021 browser compatibility is about 94% according to Wikipedia.

In June 2021, Google will start updating their search algorithm to include their Page Experience and Core Vitals metrics. Using the WebP format will definitely help improve these metrics. The problem is not all browsers support WebP and older browsers, looking at you Safari 13, will never support WebP. As mentioned earlier, Safari 14 just came out less than a year ago as of this writing. So Safari 13 is by no means an “old” browser.

So, what’s this article all about?

In order to have your website show WebP images only to compatible browsers and JPEG/PNG images to older, non-compatible browsers, you’ll need your server to respond to the browsers requests. In particular, the browser always sends an “Accept” header when it makes a request. You can configure your server to check this header and determine what file to return. But since this article is about WPEngine and Cloudways, we have plugins to do the majority of the work.

If you’re using Apache, plugins like WebP Express and WebP Converter for Media will work out of the box. Just install, activate, and all should be good. The plugin will write to your .htaccess file and handle everything. The problem comes when you’re on NGINX and have to deal with entry-level support.

Both WebP Express and WebP Converter for Media have special instructions when it comes to NGINX. They ask you to add some configuration to NGINX settings which does what I described earlier. For both WPEngine and Cloudways, you’ll need to contact support and ask them to add it. But it’s not as simple as it sounds due to the lack of their experience.

WebP on WPEngine

WPEngine has an actual page to help you add WebP support using the WebP Express plugin. However, I contacted support 3 different times and probably spent 1-2 hours on chat with them overall. And after all that I still had to do my own workaround. Here’s what I learned:

  • If WebP images are being served to Safari 13, it will not show. Don’t let support get away with telling you “WebP is not supported on Safari”. The first chat I gave up because I just thought it was a dead end. If they keep insisting nothing is wrong, ask for a Senior Rep.
  • Entry-level support does not know how to update NGINX settings. Make sure to tell them to enter the NGINX rules in the “BEFORE” section. Two separate entry-level support helped me with this and they both got it wrong apparently.
  • After all is said and done, WPEngine’s CDN, MaxCDN, does not support serving different images based on the browsers header. So make sure to turn off CDN while initially trying to get this to work.

After 3 chats with entry-level support and 1 senior rep, and getting WebP working for one day, it turns out WPEngine’s own CDN does NOT support this. You would think at least the senior rep would know, but it took an upset client seeing blank images to reveal this. MaxCDN just caches the image at the specified URL. It does not take account the browser’s header information.

So what’s the solution? After an extensive search I found Bunny CDN. (they’re a life saver, but I have to mention these links are referral links). They are a fast, inexpensive, pay-as-you-go CDN that gives you the option to cache requests based on the browser headers. They call it Vary Cache and they explicitly say they “store two versions of image files depending on the web browser’s WebP format support”. Which is perfect for what I needed.

In Summary, to get WebP images working on WPEngine:

  1. Turn off CDN in your user portal if you’re using WPEngine’s CDN.
  2. Have support add the appropriate NGINX setting in the correct place.
  3. Signup to Bunny CDN (they have a free 14-day trial)
    1. turn on WebP support in Bunny CDN’s settings.
    2. install and setup the free Bunny CDN plugin

WebP on Cloudways

Similar to WPEngine, Cloudways took a bunch of back and forth to successfully get WebP working. I’m not sure if this is due to the CDN also, or if I just got bad support for a week. In the end, after about 20 or so ticket messages, and multiple “WebP is not supported on Safari” replies, it finally worked. I asked what I could ask for if I wanted to get this working again on another install and they said:

We mainly do 3 things in the server/app when wanting this webp enabled for an app.

  1. Add webp aptitude package as some of them may use this Linux utility
  2. We update the app’s Nginx config to bypass extensions like jpg, png, gif so that Apache will get to handle them along with PHP requests
  3. We exclude from caching these file extensions in app area > Application Settings > Varnish Rules /(.+.(jpeg|jpg|gif|png))?$

Cloudways also uses MaxCDN for their CDN, so I used Bunny CDN again.

At first I used the WebP Express plugin, but found that plugin to be way too resource intensive. My 2GB RAM server slowed to crawl whenever WebP Express had to generate WebP images. That got me looking for another plugin which lead me to WebP Converter for Media. WebP Converter does all the conversion up front so resources are not used when a user visits the site. Looking back, I could probably configure WebP Express to do this, but WebP Converter for Media is much simpler.

In Conclusion

The WebP format is still very new for web hosts. If it’s not working for you, keep pushing to figure out what’s wrong. What you basically need is a plugin to convert WebP images on upload and for existing images, correct server settings to serve the right image based on a browser’s request header, and a CDN that supports multiple images for one url (if you use a CDN).

Comparing Web Hosts

January 2, 2020 by webhead

All web hosting companies are not created equal, but that doesn’t mean one webhost is always better than the other. Like anything, it depends. It depends on what you’re expertise is, depends on what you need it for, and depends on how much you’re willing to pay.

I’m currently using three different web hosts: Kinsta, Cloudways, and WPEngine. I have moved away from the cheaper shared hosting plans like on GoDaddy and HostGator due to the lack of speed and security on those services.

Like any hosting review or comparison post, this post and site includes affiliate links.

The Players

First off, all hosts being compared here do managed hosting. This means the host takes care of the server, and possibly WordPress, keeping your server up-to-date so you don’t need to worry about it. In other words, you won’t see 10 year old versions of PHP on these servers.

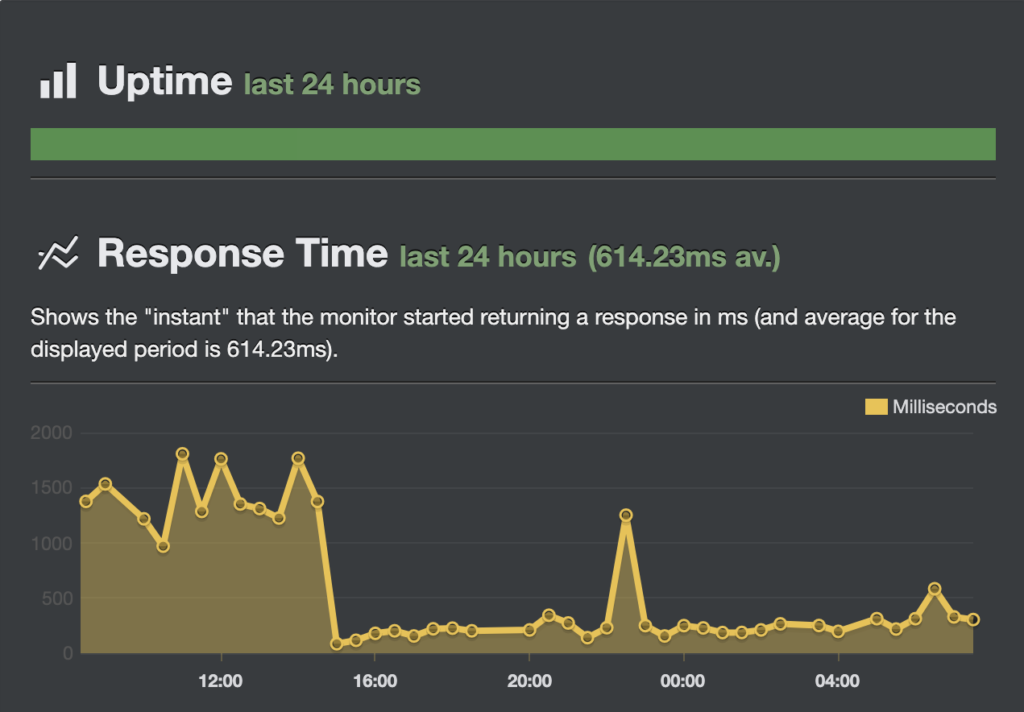
Also, all three hosts are faster than your average web host. Your milage may vary but this is how the response times looked when moving to one of these hosts:

Response time during the switch from a MediaTemple VPS plan to Cloudways

All three hosts also have their own caching system. WPEngine developed their own system called EverCache. Kinsta has their own called Kinsta cache. Cloudways developed Breeze which is also available in the WordPress repository. The main reason they have their own caching systems is to keep it simple for the user. Most of the settings are minimal with minimal setup. Like any caching system, they help reduce the load on the server while speeding up loading times for your visitors.

Shameless plug: You may find it difficult to immediately see your updates using any caching system. This is why I developed a plugin to clear the cache after a variety of updates.

WPEngine was founded in 2010 and employs 251 – 500 employees at the time of this writing according to Crunchbase. They are located in Texas, USA and are very well funded. Automattic, the company behind WordPress was an initial investor in this venture. WPEngine at one time used Linode servers, but I believe they are now using Google Cloud Engine and Amazon Web Service. WPEngine does shared hosting where they host a number of websites that share a pool of resources. They are still faster than those cheaper shared hosting services like on GoDaddy because their servers are optimized for WordPress and they have aggressive caching. In addition to that they use Google Cloud Engine so websites are not stuck on outdated physical servers that never get updated. I have been using WPEngine since 2014.

Kinsta came onto the WordPress managed hosting scene in 2013. They are a small company employing 11 – 50 employees and are located in California, USA. Kinsta uses Google Cloud Engine and is a blend of shared hosting and VPS. Their resources are shared over their websites, but the software that runs each site is only for that site. They also allocate a set number of PHP workers to each site which prevents your site from going down because of a bad neighbor. I started using Kinsta in 2019 after some horrible 502 errors could not be resolved on WPEngine.

Cloudways started in 2012. They are also a small company with 11 – 50 employees and are located in Mosta, Malta. Where is that? Somewhere in the Mediterranean Sea below Italy. Cloudways is basically a reseller of Amazon Web Services (AWS), Google Cloud Engine (GCE), Lindoe, and other cloud services, but limit your resources like a VPS. Why not just go directly to the cloud services? Cloudways sets up the WordPress, Joomla, Magento server for you and keeps the server up-to-date. They also make it much easier to use those cloud services with their own control panel. Cloudways basically offers Managed VPS hosting, but on cloud servers. This means your site will be more reliable and flexible than a traditional VPS because it’s not just on one physical server. They are similar to Kinsta except they offer plans based on resources vs plans per website. I decided to look for a host that used cloud services like Kinsta, but at a cheaper rate.

The Good

WPEngine is one of the first managed WordPress hosts. They offer the most user-friendly hosting with CDN, caching, backup/restore, and multiple environments all with a few clicks. The more WordPress installs you have the cheaper they get. WPEngine is continuously adding to their feature list with Content and Page Performance tools, git repositories, Genesis Themes, and now a Devkit that allows you to setup a local environment that can push and pull from WPEngine. In addition to the dev tools, WPEngine also seems to have the best presentation. What I mean by that is, they have a bunch of security posts in their blog, a robust toolset for all levels of websites, and a recognizable customer base.

Kinsta’s logging interface and speed are outstanding. If you thought WPEngine was fast, Kinsta is faster, especially for websites which have a membership or logged in area. Because Kinsta dedicates at least 2 PHP workers to your site, you consistently get speedy responses when doing operations that require PHP (like a search or add/update/delete operations). Kinsta has similar one-click staging, CDN setup, caching, and backup/restore like WPEngine. However, it exceeded my expectations in its logging interface. Logs show you instantly in a graphical way if you have any 5xx (500, 502, 504, etc), 4xx, 3xx, and 2xx responses and what URLs reported them. See here for how beautiful this all looks and how easy it is to identify. This along with having a set number of PHP Workers (not variable like WPEngine) allowed me to resolve 502 errors which I couldn’t do on WPEngine.

Cloudways is the cheapest solution of the three. For $10/month you could have multiple small websites running. If you need more, you pay for what you need. Cloudways’ moto is all about having choice. They have tiered plans to increase RAM and number of CPUs but if you just need bandwidth or storage you can do that separately and only pay for what you need. Cloudways like Kinsta uses Google Cloud Engine, but you can also choose other cloud services too. Their pricing structure allows customers with 1 website to thousands of websites to have very cheap hosting and a set amount of resources.

The Bad

WPEngine used to have superb support with quick response times and a knowledgeable staff. Now, WPEngine’s support can only answer basic questions and at times there is a long queue.

Another issue with WPEngine is that they are a shared hosting environment. Computing resources are becoming scarce as neighboring sites on your server take up all the processing (php workers) and leave you with 502 or 504 errors. I’ve had one site that was crippled by these errors right after upgrading to PHP 7. Hence the trying out Kinsta.

I’d have to say Kinsta is the best host out of the three… oops, not yet, we’re still in the bad section. Kinsta’s cost is probably the worst thing about them. Their multiple website plan isn’t as affordable as WPEngine’s.

Cloudways is cheap for a reason. They don’t have tools that WPEngine or Kinsta have and a lot of the one-click setup like cache, CDN, or even viewing logs is not there. To view logs you have to use SSH/SFTP and download the log file. To setup caching you’ll need to install their plugin and do some simple setup. Setting up a staging site is a bit more involved than clicking a button, but doable. No command line knowledge is needed, just a bunch of clicking and going through some tutorials.

Another issue I had with Cloudways is the discrepancies between support and the knowledge base. On multiple instances I had to inform support that their knowledge base was conflicting what they were telling me. I guess on the plus side they corrected it the next day.

The Recommendation

If I was so happy with one host I’d probably not have this review page comparing three different hosts. So each host is recommended depending on your situation.

Use WPEngine if

  • You have 5 or more websites (or don’t mind the high cost)
  • Want things already setup and pretty
  • Don’t have a membership site. You have a mostly static site that is cacheable.
  • Want more dev tools
  • Want/need a larger company with a recognizable customer list managing your server.

WPEngine has the most tools and is the most funded company of the three here. If you don’t care for the dev tools they offer, I’d recommend one of the other two choices. WPEngine is fast and reliable for the typical informational website. Visit their pricing page. If you need a lot of dynamic processing I would go with one of the other two.

Use Kinsta if

  • You have 5 or more websites (or don’t mind the high cost)
  • Want good logging
  • Want a set number of resources for your website
  • Want things already setup and pretty
  • You have a more dynamic website that can’t be cached and want it to be fast

Kinsta is faster than WPEngine in terms of processing dynamic pages. The WordPress admin dashboard for example is noticeably faster. You’ll realize instantly how fast they are. Their logging interface will allow you to debug your website better. The set number of PHP workers for your environment prevents the “noisy neighbor” problem. Be assured you won’t have your resources taken by other websites. Visit their pricing page and see what hosting your site is like on the Premium Tier of the Google Cloud Platform.

Use Cloudways if

  • You want the cheapest solution
  • You like choices
  • Don’t mind doing a little setup
  • Want to pay based on bandwidth, CPU, memory

Cloudways allows customers with any amount of websites to have a very affordable hosting solution. You can have as many installs as you want on your server and pick from AWS, GCE, Linode, and others. You more or less pay for what you need. If you only need a set amount of resources you can get the cheapest plan and upgrade when you need more. At Cloudways you pay for the resources you need, not by the amount of websites or visitors. Visit their pricing page.

Contact Form 7 Multi-Step Forms Update 4.0

December 19, 2019 by webhead

Update January 26, 2023: The changes in CF7 5.7.3 make it no longer viable to support the old format of the [multistep] tag. Previously, even if a form tag supported a name it would be a valid tag without a name. In CF7 5.7.3, these types of tags are ignored. The name in the tag was being used to determine the old vs the new format of the form tag, but now that the name is required, this is no longer possible. If you see the [multistep] tag in your forms, please make sure you are using the “new” format which has been the main format since 2019.

Version 4.0 of the Contact Form 7 Multi-Step Forms plugin introduces a new format for the multistep tag. This new format allows for more options to be set for each form. The old format looks something like this:

[multistep "1-3-/your-next-url/"]

The new format looks something like this:

[multistep multistep-123 first_step "/your-next-url/"]

Current and total steps are no longer necessary, but each form-tag needs a name. The name (multistep-123 in the above example) is how the plugin determines if you are using the old or new format.

With the new format you can optionally send email on each step, allow users to enter at different steps, and skip saving to the database when using the Flamingo or CF7DB7 plugins.

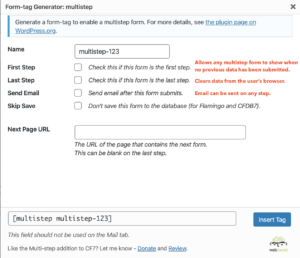
To convert to the new format, it’s easiest to use the Form-tag generator provided with Contact Form 7. Click on the “multistep” button to insert the new form-tag into your form. If the current form is the first step, check the “First Step” checkbox. Similarly, check the “Last Step” checkbox if it’s the last step. Enter the next url in the “Next Page URL” box and insert the form tag.

Form-tag Generator for the multistep tag

Once the new multistep form-tag is inserted into the form, you can remove the old multistep form-tag.

Do this for each form in your multi-step form. Mixing the old and new formats do not work.

Email is no longer sent automatically! On the last step, make sure to check the “Send Email” checkbox when generating the multistep form-tag.

WP-Cron Status Checker

September 23, 2019 by webhead

WP-Cron is the single most important part of WordPress. It runs everything from checking for security updates, to cleaning your database of old data, to processing bills. If WP-Cron fails to complete, this plugin will let you know.

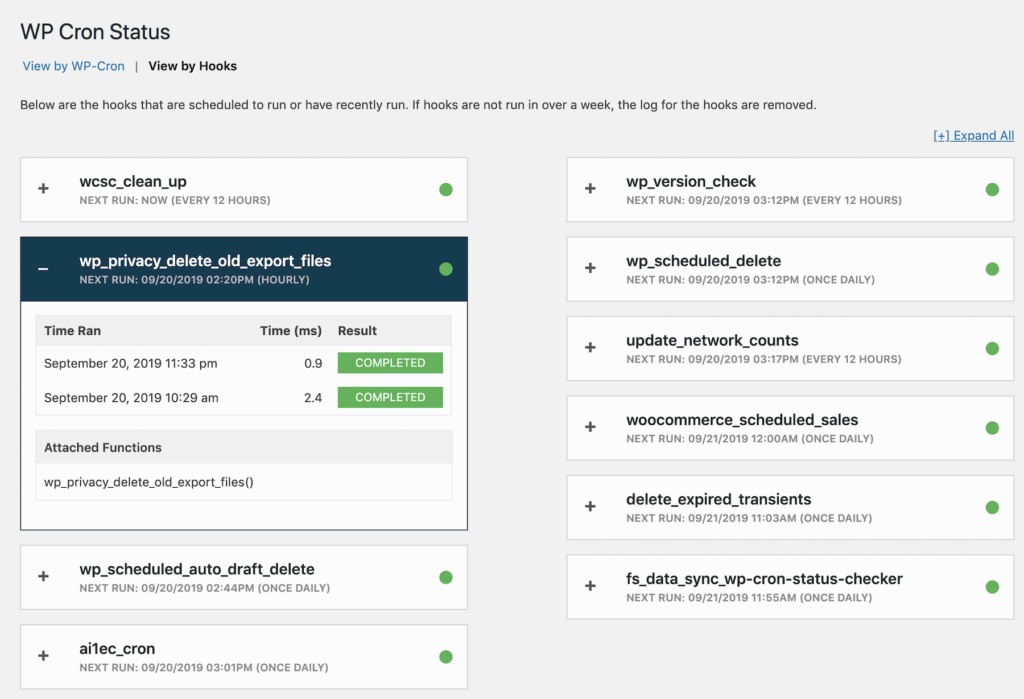
The WP-Cron Status Checker plugin lets you know if WP-Cron can’t run and if any jobs fail to complete. It keeps a log of all the WP-Cron runs while also letting you know how long each job took to run and when it ran.

There are two types of errors that this plugin can detect. The first is if WP-Cron cannot run. Sometimes WordPress or your server are not set up properly and some permissions or settings need to be changed. If this is the case you’ll receive an email saying something like “WP-Cron Cannot Run”.

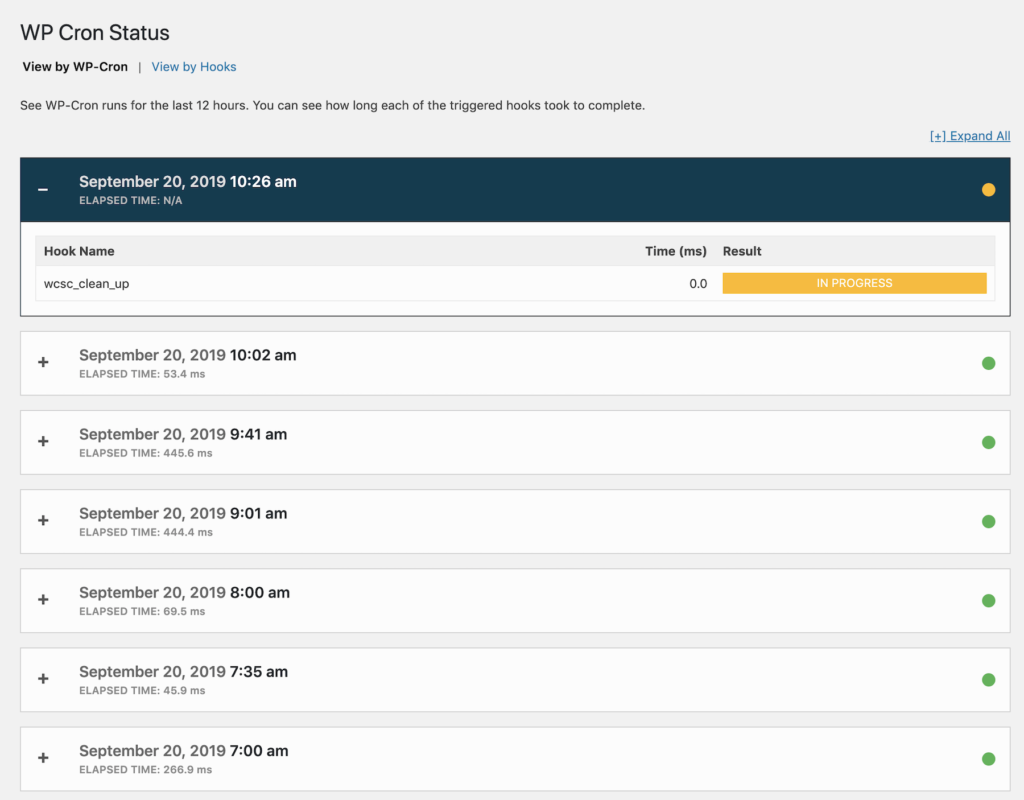
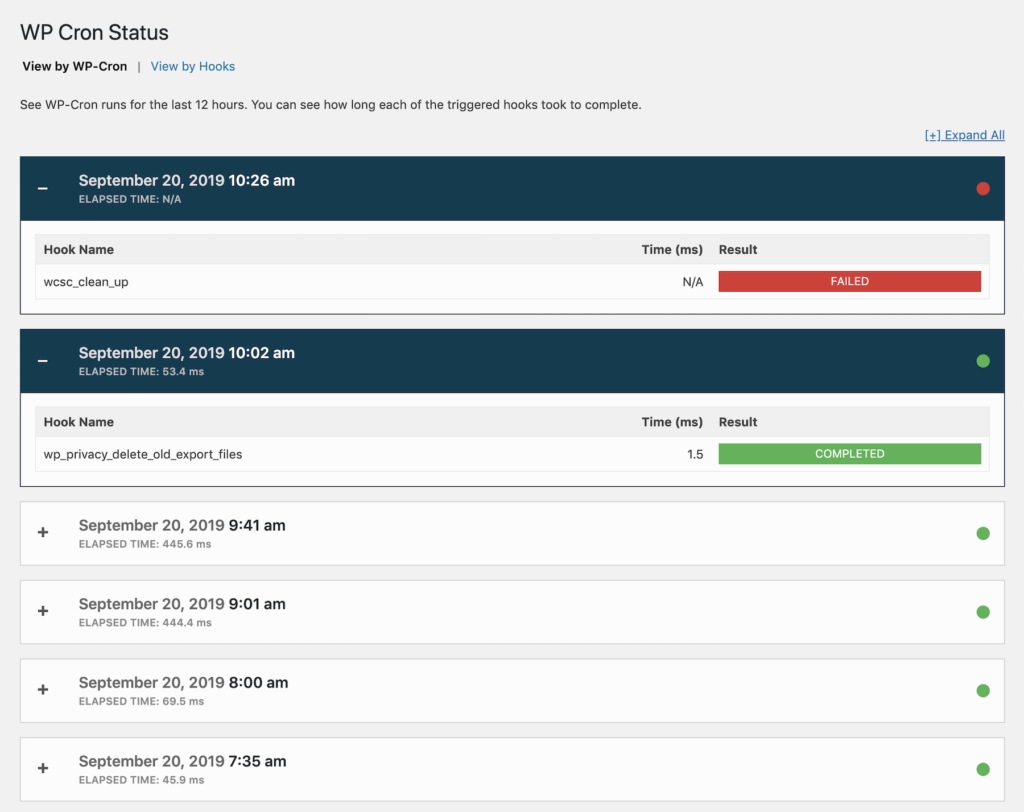
The second type of error is if a plugin, theme or even WordPress core has a programming error. It could be a PHP error, or just something unexpected that causes an error and stops the WP-Cron process. In this case you’ll receive an email saying something like “WP-Cron Failed to Complete”. Below are the different errors you can get and what they mean:

  • COMPLETED – The job completed successfully.
  • EXITED – This job completed without errors. Most likely this process was designed to exit early and not go through the full WordPress process. No errors were detected so this is considered a success.
  • IN PROGRESS – Still currently running.
  • FAILED – The job failed to complete. Either an error occurred, or it’s been 5 minutes and the process has still not completed.
  • SKIPPED – If a hook is giving you problems and you know about it, you can skip it by hooking into the ‘wcsc_skip_hook’ hook. If you don’t hook into that hook you shouldn’t ever get this result.

This free plugin is available on the WordPress plugin repository:
https://wordpress.org/plugins/wp-cron-status-checker/

PRO VERSION

The free version is limited to logging just 3 WP-Cron runs at a time. The PRO version removes this limitation and lets you keep logs longer and get notified sooner. I will be adding to the PRO version as I have more time and get more requests. So for now you can get locked into a low annual subscription cost (provided you don’t let your subscription expire). I’ll continue to add new features and raise the price as they are added.

WHAT IS TRACKED?
Data is collected for every site (or sub-site in multisite installations) the admin opts in for or that has an active license key. Most data-points are collected on a weekly cycle, and only if there are changes. Some events like license activation/deactivation and plugin activation/uninstall are collected immediately.

Classy Blocks

May 7, 2019 by webhead

Classy blocks is a WordPress plugin that makes adding additional CSS classes a breeze in the new WordPress blocks editor (gutenberg). Instead of typing in a CSS class in the Advanced -> Additional CSS Classes textbox, let your editors select a CSS class in a dropdown you create.

Create a block field that appears in the Inspector with a user-friendly UI. Add your CSS classes through the WordPress Customizer’s Additional CSS or your theme’s stylesheets. Then blocks can have custom css classes with the click of a dropdown just like this block. This block has the bottom green border and padding added with the plugin.

Download the Classy Blocks plugin in the WordPress plugin repository: http://wordpress.org/plugins/classy-blocks

  • Go to page 1
  • Go to page 2
  • Go to page 3
  • Go to page 4
  • Go to Next Page »